Saturday, January 31, 2009
Vintage Sewing Pedal Goes Contemporary
This polka dotted delight was retrieved from an old sewing machine that had seen better days. Paired with only one other element, it makes for a very practical desk organizer for my daughter.
Twenty-five pounds of stacked black rusty free weights make up the base. I found these for, you guessed it...FREE! You can't get any better than that.
Next item needed...my $20 Goodwill find. An old WHITE sewing machine cabinet. Right away I spotted the cool circles on the pedal and knew I wanted to use it for a project. More will come from the other parts, don't you worry.
Once dismantled, by keeping the rod running through this cast iron lovely, I was able to just slip it inside the center of the stacked barbell weights. Nice and sturdy.
Alas, my daughter can use this magnetic stand for all her party invites (isn't that puppy cute!), her to-do lists, and it even comes with a built-in pen holder.
I like simple projects, how about you? As always, take care and keep on junking!
Monday, January 19, 2009
Totally Tubular! - Glass Cigar Tube Project
Hi Everyone!
It has been a while, hasn't it? I'm so sorry. Like many people, life is getting in the way of my blogging time and I don't like it!! I want to share an easy project with you that includes items that are generally easy to find. I'll call it cigart.
After receiving over 100 glass cigar tubes for free, I thought I better get started on projects that would incorporate these great gifts. One obvious way to use them is to allow the tubes to serve as mini vases. That's what I did here.
I attempted to make my floral bouquet display with items found already in my home so I could play along with Down Home DIY's challenge on a temporary basis. ;) Unfortunately I forgot I needed to add flowers. Gggrrr.
Supplies you'll need: Wooden block with holes (I purchased mine at the Country Living Fair 2007 in Ohio, however you can make one of these if you're handy). Glass cigar tubes or test tubes. Corrugated cardboard (cut from packaging sent to me by a junk friend). Vintage buttons and any old ribbon will do.
Glue cardboard to the block and tie ribbon around it using a dab of glue here and there to adhere. Place glass tubes in holes with random heights and fill with buttons once tubes are placed how you want them. The buttons will fall into place to fill the gaps. Find some gorgeous flowers to finish it off! I found this display looked even prettier a couple days after I took the photos because the tulips settle and start to droop a bit. This effect is so sweet!
This project is totally tubular, man.
Just a note - Coordinate the display using your own style by replacing the buttons with seashells, sand, decorative rocks, aquarium pebbles, beads, or anything else you can come up with.
As always, take care and keep on junking!
Friday, January 9, 2009
Industrial Bakery Whisk Light Fixture
Can we talk creative here? My online junking friend Georgia, of Georgia Moon in Grover Beach, CA, found this fantastic jumbo industrial whisk at an estate sale and transformed it into an amazing lighting fixture. She was inspired by a project completed by Kimberly Melamed, of JUNKMARKET Style, who provided fantastic instructions on how to do so.
What I love about this piece is that it would go well with so many decorating syles. Industrial (obviously), country, eclectic, whimsical, etc. The best part is she's selling it in her shop and online as we speak! So if you'd like to light up your home decor with something unique, I suggest you whisk on over to Georgia's shop and grab it while you can!
As always, take care and keep on junking!
Saturday, January 3, 2009
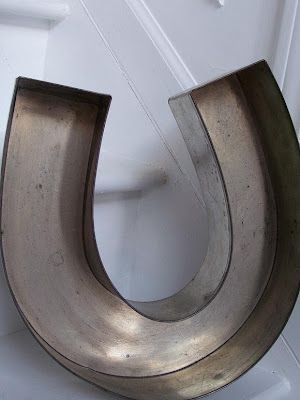
Horseshoe Cake Pan Magnetic Message Board
What better way to bring luck into the new year! A horseshoe shaped message center can be a serendipitous reminder of your good fortune for 2009.
Old cake pans can be found in abundance at thrift stores, flea markets, Craigslist, and more. Cover one side with a minimum of three coats of chalkboard paint. I recommend taping the pan off well and using the spray paint version for a smoother finish.
The best part is most cake pans are made of steel so magnets will stick right to them.
Do you think I could pass this one off as a "C" for Candy?
As always, take care and keep on junking!
Subscribe to:
Posts (Atom)